How to Grow Potatoes at Home
1September 12, 2012 by Hope Gardens
 Disclaimer: We have had luck with growing spuds in trash cans but even more luck in plastic storage bins with holes punched or drilled into the bottom. I like a 20-45 gallon tub, the larger the tub the more substantial the harvest. Outside of the trash can itself, the rules below apply to growing potatoes just about anywhere.
HOW TO GROW YOUR SPUDS
Welcome to everything you could want to know about growing organic potatoes in a trash can! Potatoes grow from potatoes seeds, which are bred to grow new potatoes. You don’t use store-bought potatoes as they can bear disease and are sometimes sprayed with a chemical to keep them from sprouting. I order my seed from Peaceful Valley. They have a great site with excellent garden educational videos. Following is everything you need to do to grow your potatoes…it’s a little involved, but I know you can do it following these simple instructions. Have fun and I hope you get a big harvest!
PREP YOUR POTATOES: CHITTING

This is what will be going on with your potatoes in the first few weeks. The method is simple: spread the potato seeds in open-top flats, one layer deep with the “seed end” uppermost. (If you closely observe a seed potato, you’ll notice that one end was attached to the plant, the other end has a larger number of eyes from which the sprouts emerge. This end with the eye cluster is called the seed end.) The flats are kept in a warm place (70 degrees F.) where light levels are medium in intensity (bright shade). The warmth stimulates the development of strong sprouts from the bud eye clusters, which in the presence of light, remain stubby and so are not easily broken off.

Usually seed potatoes are chitted starting a week or two before planting. Cut the seed potato just before planting. Cut potatoes with no less than 2-3 eyes and with plenty of space around the eyes. Egg-sized potato seeds should be planted whole (and are considered the best seed potatoes). Pro tip: Dust cut pieces with organic sulfur by placing a teaspoonful or two in a large paper sack and gently tossing the cut potato seed pieces to cover them with sulfur dust.
PREPPING THE CAN
Drill lots of holes on bottom of 20 – 32 gallon trash can and around the outside wall, 3-6” from the bottom. Place layer of gravel in the bottom of the can for drainage. You can sit your can on top of wood blocks if you like to keep water and soil from pooling on your tile or cement. Place your can in an area that gets 4-6 hours of direct sunlight.
If you don’t have a can, plant in-ground on 6″ of loose, well-dug soil. Top the potato seeds with at least 4″ of soil. Digging a trench and planting the potato seeds in the trench is a good idea. As you’ll soon learn, you will have to mound the soil over the plants as they grow and a trench makes that easier.
PLANTING

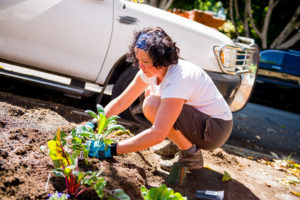
Add 6” of POTTING SOIL and mix in 1/2-cup fertilizer high in phosphorus and low in nitrogen. Dust the top of the soil with fertilizer-free soil. Add potato seeds 5” apart (4 starts to a can). Place cut potato seeds cut side DOWN and more importantly, sprout side UP. Cover with 4” of fertilizer-free soil mixed with well-rotted compost if you have it. Soil should be loose. Do NOT push down on soil or compact it. Do NOT place lid on top of can.
WATERING
Watering is very important, especially in containers. Keep the soil moist, but not soggy. Do not let potatoes dry out. Water in the morning, once a week in cool weather and then every other day in hot weather. (When foliage turns yellow and dies, stop watering. This allows the tubers to mature. More on this later.)
MOUNDING

This is the most important part of potato planting and the main reason we are growing them in a trash can. Potatoes cannot be exposed to the sun while they are growing; they turn green and green potatoes can be toxic and should be thrown away. That is why you will be piling soil on top of them, or mounding the soil (also called hilling).
When the potato plant starts to grow mark your calendar so you can see how long your potatoes take to grow!
Then, when the plant grows 6-8” above the soil line in the bin, you are going to add 2-3” of soil. Check your potatoes every week to see if they need mounding. Never cover more than a third of the new growth or, to put it another way, try to leave 4-6” of stem on top of the soil as the plant grows. You will be mounding and mounding the plant as it grows for the next couple months. Don’t mound dirt over the flowers, only the stems and leaves.
Pro tip: here’s a great additional fertilizer trick you can try if you are feeling adventurous: Mix ½ cup of molasses in 5 gallons of water. Soak the molasses in the water for a day and night, stirring several times a day. Apply the liquid molasses to the roots of the potato plant 1-4x during the growing season. This will get you amazing results!
MY PLANTS ARE FLOWERING!

Yeah! Now stop fertilizing but don’t stop watering or mounding. (When flowers and leaves yellow and die, you will stop watering and mounding.)
HARVEST
After green plants turn brown, stop watering and mounding and mark the date on your calendar. At least 2 weeks later, in the morning or early evening, in the shade, carefully turn your bin over onto a tarp and remove your potatoes. Do not expose them to sunlight or they will not last as long. Any potatoes that get damaged or have the skin knocked off should be enjoyed first.
Revision: I have had clients that have completely ignored their potato bins and still ended up having great results. I can’t explain this or condone it, but if you do forget about your bin, don’t hesitate to harvest it!
Reserve the bin soil for use in your flowerbeds or herb garden. This soil should not be used for planting tomatoes, peppers, eggplant or potatoes again. There is a chance of spreading disease among this same family of vegetables if the same soil is used over.

CURING YOUR POTATOES
Taters are ideally stored at 40 degrees but not many of us have root cellars in Los Angeles. Keep your potatoes in the dark in the coolest spot in your house or apartment (kitchens and refrigerators are not good places) and keep in small piles as potatoes bruise easily. Do not wash them. In fact keep them as dry as possible. You can carefully wipe the dirt off them with your hands. Burlap bags are good potato holders. Potatoes will last up to 3 months in a cool, dark place…if you don’t eat them first!
YOU’VE DONE IT!

Enjoy your organic taters and thanks for your potato business. Now you’re the potato expert! Please call Hope Gardens with any questions: 323-493-5177.
TATERLICIOUS INFO
Potatoes are the only vegetable a person can solely survive on. And although potatoes are mostly starch, they can contain up to about 11% protein!
Potatoes are definitely mysterious little tubers. They like to grow in the dark, hidden under mounds and mounds of warm compost. They are grown from potato “seeds,” which are actually specialty potatoes raised to grow potatoes, which must be “chitted” before planting. And the “eye” of a potato is where the potato’s stalk and its lovely purple flowers will grow from.
For all their mysterious ways, you can get an amazing potato yield from an ordinary plastic trash can!

Order your taters today!
Category Vegetable gardening | Tags: fertilizer, Garden, Home garden, organic, Plant, potato, potatoes, Seed, Soil